Tuesday, July 31, 2012

Wirelessly Networking Your Mac To An LS9 or M7


One of the most useful functions of the LS-9, aside from precise control of your audible environment, is its ability to be controlled wirelessly.  The process isn’t as difficult as you may think, but can, at times be a little confusing.  So light a candle, do some yoga, open a window, or whatever helps you achieve Zen-like tranquility and let’s get started

You’re going to need a few pieces of gear in addition to the console before we start, so here’s the list.

1)      Macbook running OS X
2)           Yamaha Studio Manager utility (here’s the link in case you don’t have it)
3)           You’ll also need to download the editor for the LS-9. This installs inside Studio Manager so it can be configured for multiple consoles. Here’s the link.
4)           Yamaha Midi to Network driver, and its link.
5)      A wireless router (I prefer the Netgear N300 4 port unit)
6)           A CAT 5 (NON-Crossover) cable long enough to hook your router to your LS-9
7)           Pen and paper can come in handy.

Begin by powering up the console, then navigate to the set up window.  (Under the display access section, just left of the display press the setup button). You’ll need to page through to the misc setup tab, shown here.


Notice the IP Address field; you might want to write it down because you’ll be using it in just a bit when we setup the software. You may also end up needing to change this depending on your router accessibility.

The next step is to wire up the router and connect to it via your computer. In case you need a refresher course on networking, I’ve included these cool blue bubbles to help you.

You’re welcome.


While you’re in your router you may as well setup your SSID (that’s the name that shows up when you scan for wireless networks. Use something you can easily identify.) You don’t have to, but I like to password protect my networks also.

(Here’s a tip, you may find that it’s easier to change the IP of your console if you have a router that is difficult to setup or your connecting to a larger network.)

(Here’s another tip, If you need to change your Mac’s IP address you can do it from the Network section of your System Preferences.)


After you have your router addressed and rockin’, connect it your console using your CAT5 (NON-Crossover) cable and login to the wireless network created by the router. If you’re still having trouble creating a wireless network with a password, the manual for your specific router should be able help you with that.

If you haven’t already done so, now is also a good time to install the Yamaha software. I recommend starting with the Network to Midi Driver then the Studio Manager.
Remember to install the LS-9 editor along with Studio Manager.
Go ahead, I’ll wait.

Once you have installed the Network to Midi driver, you need to set it up. This allows the computer to communicate in Midi to the console.  It looks like this in your system preferences window… (bottom left)


You may be asking, “Joe, what the heck is MIDI?” MIDI is a digital language used to link machines together and let them communicate with each other. Most commonly found in professional keyboards and sound modules but not limited to NPC’s and sound samplers.


Now that you found the driver, we need to tell it where to find the LS-9. Click on “Advanced Settings” and tell it to search the range of IP addresses that your console is in.  Once it finds your console, click “Add to Device List”, use your pen and paper to write down the port number assigned to it, you will need this in a moment.  Here’s what you will be seeing on that screen…


This is also where you will setup the port configuration for multiple consoles. The next time you need to connect to a specific console, you will have already told your Mac where to find it.


Now that you’ve told your hardware how to talk, it’s time to get the software in on the conversation. Open up Studio Manager and click on the LS-9 icon (This is where the editor I told you about earlier comes into play.)  Once that loads you will see a virtual LS-9 on your screen.
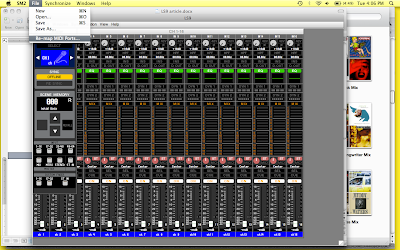
Click on “File” at the top left of your SM2 Window and choose “Map Midi Ports” like this…


Make sure the ports you wrote down earlier are included in the above list.


Now click the “File” tab in the Mixer Window (inside the SM2 Window) and select “System Setup” which looks like this…


Match the input and output ports, to the ports assigned to the console you’re using, which you wrote on your pad of paper a moment ago, and that’s it. Leave the rest of the setting as they are and click “OK”.


Now the yellow “offline” indicator will turn green and read “online”, looking like this…


Now that you are controlling your console wirelessly, you can move freely about and tweak to your hearts content. Enjoy your newfound freedom denizen of the decibel.

Please Note: This process will also get you wireless control of an M7 console.


Article by:
Joe McLellan
Audio Technician/Engineer
J&S Audio Visual
Show Services

Originally from Florida Joe moved to Texas 2006 after graduating from Full Sail in Winter Park, FL. He formed an interest in a technical career at the age of 15 after taking up the bass guitar, and came on full time at J&S in 2007. Besides his duties designing, engineering, and running corporate events for J&S Audio Visual Show Services division, in his free time he records for local musicians and podcasters. He is also a music hoarder and frequents local record shops for the latest in obscure bands and music. 

Com Wars. 2.4 GHz vs. TV Band


When you need to communicate with your crew, yet still have your hands free for grabbing talent, taking notes, and coordinating small military invasions; Of course this means you will probably be running around the entire ballroom like a frat party gone terribly wrong, requiring you to be un-tethered… (*breath*) you need wireless com.

Here is what we offer at J&S in our Show Services department:

HME DX200
Telex BTR700/800

In this article we will compare and contrast these two units, and perhaps show a proper environment for each.


HME Overview
The DX200 is pretty much hands off. Turn it on and go, and here’s why.  This unit operates in the 2.4GHz range, well above the embattled TV frequencies, (think Bluetooth).  Much like a Bluetooth phone device, on initial set up the belt packs need to be registered to the base station, this creates a 64-bit encrypted link between the two, and as long as everything functions normally will never need to be repeated.

HME Nifty Features
1.            The DX200 allows all of the beltpacks (max of 15 per station, although we only carry 4) to function independently of one another on a single frequency.
2.            Makes them virtually impervious to outside interference.
3.            If a private conversation is your cup of tea, encryption is your friend.  Assuming you are speaking only to others within the DX200 system your frequency cannot be hacked and your conversation compromised.
4.            Lower Price Point.

In addition there are two buttons on the top of the beltpacks one marked ISO and another that says IC.  If you have this wireless unit interfaced with hardwired com, or in our case RTS, the user will press the IC button to speak to the whole crew, then if they desire to communicate only amongst the DX200 users that person would switch to the ISO button instead.  Synthesized voice prompts help you navigate the beltpack features telling you when the unit is powered on and station registration number, volume full, leaving the coverage area, battery is getting low, and of course powering off.  The BP200 belt packs are very lightweight and come with a rugged rubber jacket, which, in the words of one tech “makes me feel like I could drop kick it across the ballroom, pick it up on the other side and have it working just fine”.  This is probably not the case, and definitely not advisable, but does go to show that they are very durable.

HME Not-So-Nifty Features
The DX200 is encrypted and they have yet to come out with an encrypted mic that doesn’t sound bad.  The same is true with this com.  The user can hear with it in your typical corporate application, and can be understood as well, but it sounds like you are speaking over a phone line, and not a great one at that.  Volume is another concern.  In high volume situations like concerts, or loud parties one quickly runs out of listening volume, and as much as you beg and plead with that synthesized voice to give you more, it’s not going to happen.  Given this and the fact that you have to eat the mic and yell to be heard, if there were better volume control for both the talk and listen features independently of one another, this would make for a much more functional unit in any show environment.  NULL.  Not a typo, this is a very useful little knob in the back of the unit.  Because of the encryption there of course is a slight processing delay, or latency if you will.  This is not a problem if the HME users are speaking amongst themselves, but hit that IC button and you will find a world of disorienting time delays showing up in your listen ear.  This knob is a time delay adjustment and by turning in one direction or the other you can align the analog and digital systems that are battling one another.  Why is this in the NSNF section?  Because there are very few times this NULL device has been reported to work perfectly, leaving the crew on wireless with a reasonably usable device, yet slightly bad taste in their mouth.


BTR Overview
The BTR 700/800 has a multitude of functions and is very flexible.  It functions in the “white spaces” between TV channels. The BTR is a dual channel system, giving you both a production and specialty channel should you require it.  There are individual listen and mic volume controls, making it ideal for louder show situations, and the belt packs have a line-of-sight distance of up to 1,000 feet, giving you a pretty long RF leash.

BTR Nifty Features
1.  2 Channel system.
2.  Full-Duplex Operation (simultaneous talk and listen on both channels)
3.  Wireless Talk Around (WTA) and Stage Announce (SA) features
4.  Frequency-Agile Base Station & Beltpacks
5.  ClearScan function allows the base station to automatically search for the best channels on which to operate

The WTA channel or Wireless Talk Around is like the ISO button on the HME.  The WTA allows the BTR to communicate between belt packs only instead of system wide.  The BTR has a SA or Stage Announce button that allows you to tap into a back stage PA (or main PA in rehearsal situations) to call people up from a green room or cue someone on the side of the stage.  The ability to get into the unit settings and dial in frequencies as well as volume is a key feature.  Couple that with the fact that it has interchangeable headsets ranging from single ear lightweight to heavy-duty double muff, makes it ideal for any noise level.

BTR Not-So-Nifty Features
Set up is a little more time consuming but depending on your needs it may be worth it.  Because the audio is not encrypted there is a much higher chance that you will be infringed upon by other frequencies.  Unlike the HME, you are limited to four belt packs per main station. The BTR belt packs are large, heavy and quite cumbersome when running around, and if dropped much more susceptible to damage.  They have a tendency to be noisier then the HME when linking to a hardwired system, but most of the time a ground lift will clean that up. It has a much higher price point then the HME, but that should be expected given the many extra features.

Summary:  
The HME is easy to set up and not very susceptible to interference. However, it is low in volume, and has latency issues when interfacing with wired com, and the audio does not sound as good.  All in all not a bad unit, just make sure it is relegated to your lower volume shows.
The BTRs have more functionality and is capable of being fine-tuned to your show needs.  It takes longer to set up, and is more fragile.  We recommend using this unit in higher SPL environments, and where the client might be picky about the quality of audio on com.

NOTE: We recently picked up the HME PRO850, which is comparable in price and flexibility to the BTR units.  We are preparing to deploy this system to several show sites, and look forward to bringing a review and comparison after we road test it for several months.


Article By:
Brett Speer
Audio Technician
J&S Audio Visual
Show Services

Started down the audio path going to work for Crossroads Audio, a Dallas based sound company in 1995. He spent 9 years with them learning system design, troubleshooting, engineering, installation, repairs and mixing. While at Crossroads, Brett moonlighted with most of the area nightclubs, offering solutions to their audio problems.  In 2006 Brett went to work for Dallas Stage Right gaining experience in the lighting, video, staging, installation and warehouse management fields.  Brett joined the J&S Audio Visual Show Services audio team in 2010 as the gear coordinator where he currently puts his broad skill-set to good use.